
The Art of Repair Easy Trace Jumper for iPhone 7 Plus Qualcomm Audio IC Repair, 8 Surface Jumpers
- Tested and approved by Justin Ashord
The Easy Trace Jumper is a interposer that significantly increases the robustness of the iPhone 7 Plus Audio IC repair. This is accomplished by taking advantage of all eight surface level traces within reach of the effected IC chip including the ground. Full info for this with video and much more on YouTube.
What is the Easy Trace Jumper? What is its purpose?
The original idea and purpose of the Easy Trace Jumper was to create a drop in interposer that significantly increased the robustness of the iPhone 7 Plus Audio IC repair.
This was accomplished by taking advantage of all eight surface level traces within reach of the effected IC chip including ground, as opposed to the current one wire method and additional three upon a warranty.
So within the same time as the one wire method, you can run eight, effectively giving your repair an extra boost of confidence that you did all you could!
What makes this product so unique?
- Self Aligning – The unusual shape isn’t an accident. We went through many iterations, and designed this FPC to “drop in” using surrounding components as a guide. The ETJ is self aligning, so your jumpers and pads are perfectly aligned every time.
- No Braiding – No need to clean those pads bare and risk any further damage. The ETJ works best when there is already a small amount of solder on the pads.
- No Wires – There is no need to run any wires to surface traces. Just drop the ETJ in place, spot solder the edges, and place your IC.
- No Solder Mask – Stop struggling with UV solder mask. No more “blobs” of green liquid running between components. The ETJ has solder mask already, so those traces are protected.
- No Delay – No wires, no obsessive cleaning of flux, and no mask to cure, means no delays in getting the repair done.
- Flat Flex – No need to worry about your radial wires preventing the IC from sitting flush/flat. The ETJ is flat, like the motherboard, and like the IC, so it’s right at home sitting between the two.
- Perfect Placement – With corners marked for you, perfect placement of the IC is a breeze. Just check the corner alignment marks when placing the IC.
- More than just C12 – We included all the surface traces for you. You won’t experience an issue with microphone function or lightning headphones due to lack of jumpers. There’s 8 surface traces, including a ground. In addition, there’s a network of ground connections underneath, so you won’t run into issues due to a missing analog/digital ground reference
- Professional Finish – The finished repair looks great. Just like a clean desk, there’s a sense of satisfaction that comes with a clean trace repair job.
Community Input
We take the communities thoughts and opinions very seriously, as we are all techs ourselves, the ETJ couldn't exist in its current form without the guidance and thoughts of those who gave honest advice during
its first reveal. If you have any thoughts on ways we can improve this product, please contact [email protected] or call and leave a voicemail or txt your thoughts on the ETJ to +1 520 222 8089
Handling & Pack Removal Instructions
Its Important not to play games with your ETJ's they are fragile just like any other motherboard component, but maybe even more than that. So please treat these things carefully.
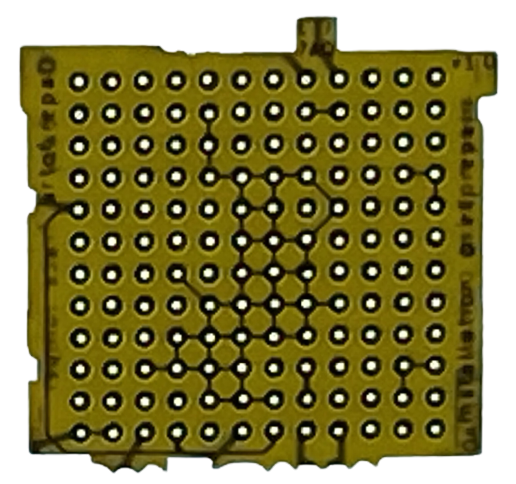
Please follow the visual below to cut out your ETJ Flush with the rest of the unit. This is how you will prevent alignment issues!
Identifying and Using the correct version of the ETJ for your specific motherboard.
There are two versions of the Easy Trace Jumper, one for Intel based motherboards and another for Qualcomm. While the
packaging and ETJs themselves have their model numbers printed on them, you can use the table below to match visually as well.
Tool Requirements for ETJ Installation.
While the rule of thumb is to always choose the largest soldering iron possible for that job to maximize the irons thermal energy being put into the board.
Please see my personally recommended soldering tip shapes, nobody uses the same brands universally, so knowing the shapes and designs can help
you decide on what will work for you.
Obviously if your experience tells you to use other shapes, then by all means you know your gear better than I do.
Tips for new solderers!
Please make sure your soldering iron tips are well maintained! If they are junked up, you wont be able to do jumpers! Notice how the images in the examples below are free of oxidation.
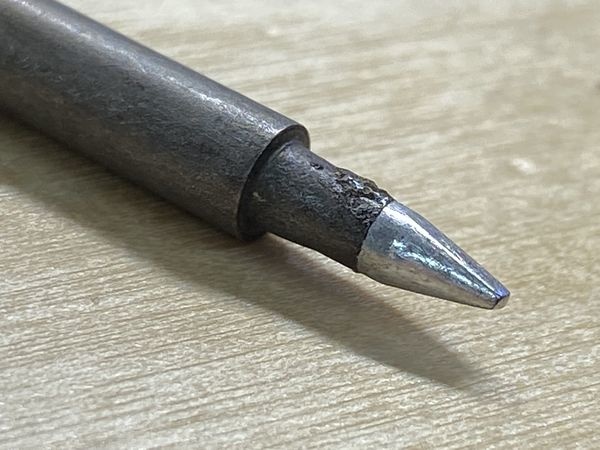
For the first portion of the installation use a Chisel TipI recommend a chisel tip that covers at least 3 pads at the same time. I am choosing this tip because its large surface area will allow for you to evenly heat the pads while trying to plant the ETJ. I do not recommend using uneven tip types such as the J type tips at least for the initial install because it will increase your install time as well as provide uneven heat and potential issues with install. |
 |
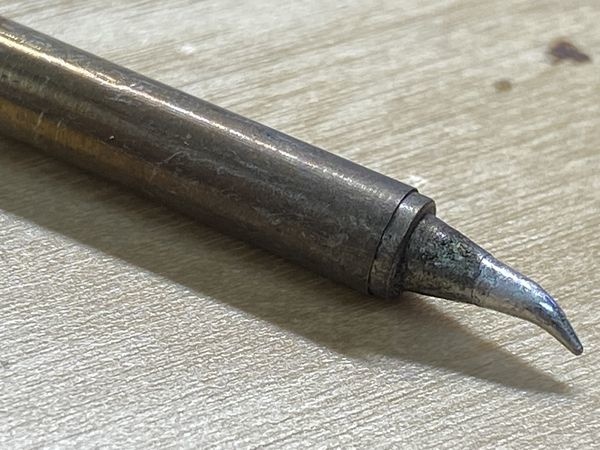
For the Jumper Points of the installation use a Conicle J TipWhen doing the jumpers, we will be making connection points to some smaller and larger mass components from 01005 to 0201 so we will need some power as well as accuracy, for this, Ill use either a straight point conical or a J tip conical. because it will allow me to hit those hard to hit spots while being able to provide more side power to hit the bigger components. |
 |
Solder & Flux
For Solder & Solder Paste, It is recommended to use 63/37 solder as both your normal realloy solder (.40mm) (.015in) & reball solder paste because of its easy of use, eutectic point and lower melting point than the boards original factory lead free.
For Flux, I personally I have used AMTECH NC-559-V2-TF But there are plenty of other good fluxes available, if you do buy AMTECH, buy it from a dealer, and never buy it in a tub, its fake!
Installation Instructions of the Easy Trace Jumper
The following instructions were written and shot for those who want the most information and may also be new to soldering, if you are adept or feel like your ego means you don't need to read instructions, feel free to bypass instructions at your leisure or as you commit them to memory, as the instructions are much more intimidating before your first install then procede to be pretty intuitive. If you feel like a step could be explained better, please contact me.
| Easy Trace Jumper Install Video | ||
|---|---|---|
| Step by Step: | ||
| Step 1 | ReAlloy Audio IC Pads with even layer of 63/37 Solder | |
| Step 2 | Use chart to make sure your using correct version of ETJ for your board version, Qualcomm or Intel | |
| Step 3 | Carefully cut out ETJ via handling guide at the top of the page. | |
| Step 4 | Solder down the array to the motherboard | |
 |
||
| Step 5 | Jump the connections to the following points to the component its touching | |
 |
||
| Optional: Reball your IC chip and save money! | ||
| Reballing your IC can be a great way to save money in the long run with issues that are isolated as a board issue not an issue with the IC you are using. This is also an important skill to learn! Alot of people skip it, learn now! I have included a video to teach you how to reball if you would like . | ||
|
|
||
.